User Interface Reference
Because of this integrated design, it cannot be used simultaneously with the NLA Editor or other NLA-based addons on the same rig. However, you are not locked into the Animation Editor Pro ecosystem; the addon includes tools to seamlessly transition your work back to the standard NLA Editor when your pipeline requires it. (See Compatibility, Bake Operator, and Clear Editor Operator sections)
Sections
The Animation Editor Pro panel is divided into several sections:
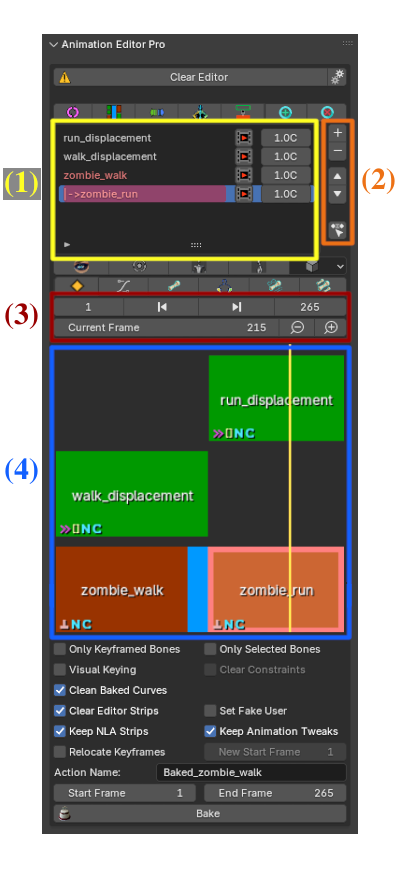
- Editor Strip List - (See user interface image - (1) )
- Strip Name - Displays the name of the strip
- White Text: Indicates an editable strip (you can add keyframes).
- Red Text: Indicates a non-editable strip (typically added from an existing action).
|->Prefix: Indicates the strip is part of a sequence within the same track and is not the first strip.
Mute Strip- Toggles the strip's influence. Disabled strips have no effect during playback or baking.
Open Strip Settings- Opens the Strip Settings popup for the strip, allowing you to adjust its properties (see below).- Track and Strip Management Operators - (See user interface image - (2) )

Add Strip- Adds a new strip.- If the editor is empty but the selected rig already has an Action assigned, this operator adds that Action as a non-editable strip by default. Note: If you want to add a strip with a specific action instead of the one assigned to the rig is better to use the
Add Editor Strip with Existing Actionoperator described below. - Otherwise, it adds a new, editable strip with a new, empty action.
Add in the Same Track- places the new strip in the current trackAdd Local Transition- creates a local transition between strips. This option is shown only whenAdd in the Same Trackis enabledTime Gap- duration of local transition (see Local Transitions). This option is shown only whenAdd in the Same Trackis enabledStart Frame- initial frame for the strip. This option is shown only whenAdd in the Same Trackis disabledIn Place- prevents bone displacement (see In Place Animation)Only Selected Bones- limits animation to selected bones (seeStrip Settings)Add Displacement Modifier- adds displacement to the chosen bone (see Displacement Modifiers)
Remove Strip- Deletes the selected strip.
Move Up- Moves the selected track higher in the editor's evaluation order.
Move Down- Moves the selected track lower in the editor's evaluation order.
Add Editor Strip with Existing Action- Opens a popup to add a pre-existing action as a non-editable strip. Only actions compatible with the selected armature are shown. Options include:Actions- List of compatible actionsAdd in the Same Track- places the new strip in the current trackAdd Local Transition- creates a local transition between strips. This option is shown only whenAdd in the Same Trackis enabledTime Gap- duration of local transition (see Local Transitions). This option is shown only whenAdd in the Same Trackis enabledStart Frame- initial frame for the strip. This option is shown only whenAdd in the Same Trackis disabledIn Place- prevents bone displacement (see In Place Animation)Only Selected Bones- limits animation to selected bones (seeStrip Settings)Add Displacement Modifier- adds displacement to the chosen bone (see Displacement Modifiers)

Go to Start Frame- Sets the current frame to the scene's start frame.
Go to End Frame- Sets the current frame to the scene's end frame.
Zoom Out Track Preview- Zooms out the track preview section.
Zoom In Track Preview- Zooms in the track preview section.- Track Preview - (See user interface image - (4) )
- Green Bars - Represent Editable Strips.
- Red Bars - Represent Non-Editable Strips (from existing actions).
- Blue Bars - Represent Local Transition Strips, blending between adjacent strips in the same track.
- Pink Outline - Highlights the currently selected strip.
- Tapered Ends - Indicate
Blend InorBlend Outis active. The length of the taper corresponds to the blend duration. - Icons (Bottom-Left Parts of the Bars) - Small symbols indicate active properties such as:

Only Selected Bones- Only selected bones will have effect in the strip.
Linear Displacement Modifier- This modifier displaces the chosen bone forward along a chosen axis.
Cyclic Displacement Modifier- This modifier displaces the chosen bone in a smooth cyclic way.
In Place- It prevents the chosen bone, or all bones being displaced (location being changed).
Disable Scale F-Curves- Disables scale fcurves in all bones (useful when using "Add" or "Subtract" blend types).
Custom Action Frame Range- A custom action frame range is settled.
Extrapolation- Indicates the extrapolation method: (N)othing, (H)old, or Hold (F)orward.
Blend Type- Indicates the blend type: (C)ombine, (R)eplace, (A)dd, (S)ubtract, or (M)ultipy.
- Timeline Cursor - A vertical line indicating the current frame.
- Yellow: Cursor is within the selected strip's time range.
- Red/Pink: Cursor is outside the selected strip's time range.
These operators manage the tracks and strips in the editor list.
Add Editor Strip with Existing Action operator to run, is a one-time setup to prevent conflicts with Blender's native NLA system. This process only affects the NLA track layout; your underlying Blender's Actions and keyframe data will not be affected.This area provides a visual, timeline-like representation of the strips and their relationships.
Strip Settings
Each strip has configurable properties accessible through its settings popup (opened via the Open Strip Settings icon in the Editor Strip List):
-
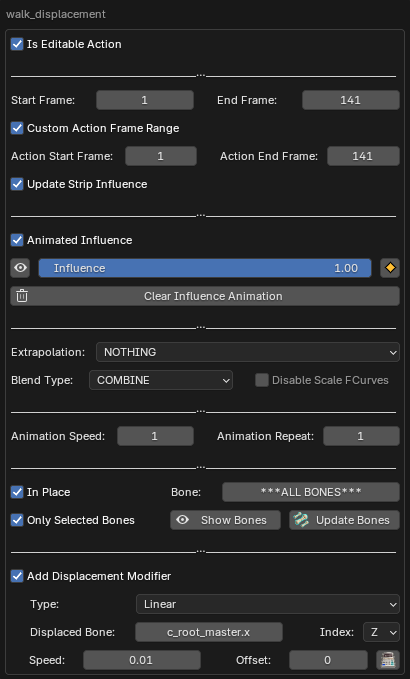
Is Editable Action- Determines whether the strip can be keyframed (converts between Editable and Non-Editable). -
Start Frame/End Frame- Sets the frame range where the strip is active in the main timeline. -
Custom Action Frame Range- When enabled, allows you to specify which portion of the underlying Blender Action is used by the strip. -
Action Start Frame/Action End Frame- The start and end frames within the Blender Action to use.Note: TheStart Framevalue can never be greater than theEnd Frame.Due to this constraint, when shifting a strip's position on the timeline:
- To move a strip forward, you must increase the
End Framefirst. - To move a strip backward, you must decrease the
Start Framefirst.
Warning: EnablingCustom Action Frame Rangeor adjusting action ranges can sometimes cause Blender to automatically modify the strip'sStart Frame/End Frame. Always double-check these values after making changes. - To move a strip forward, you must increase the
-
Update Strip Influence- This setting automatically scales the strip's Influence keyframes (e.g., a fade-in or fade-out) in proportion to its duration. When you change the strip's frame range (directly withStart Frame/End Frame, or indirectly withAction Start Frame/Action End Frame), this ensures that the timing of your blends remains visually consistent with the new length.Warning: For most situations, it is highly recommended to keep this option enabled. You should only disable it when you need to change a strip's length (either by truncating or extending it) but want the influence keyframes to remain locked to their original frame numbers. -
Animated Influence- Allows influence to change over time via keyframes. When disabled, theBlend In/Blend Outproperties are shown instead of the Influence Property. -
Influence- Controls how much the strip affects the final animation (0.0 to 1.0). Mute animated influence (keyframes) if any, and use a fixed value.
  Add a keyframe for the current strip's influence.
 Clear Influence Animationoperator deletes all strip's influence keyframes. -
Blend In/Blend Out- Defines the number of frames over which the strip fades in at the start or fades out at the end.Note: DisableAnimated Influenceto use these. Visible as tapered ends in the Track Preview. -
Extrapolation- Determines behavior before/after the strip's range (NOTHING, HOLD, HOLD_FORWARD). Visible as an icon in the Track Preview. -
Blend Type- How the strip combines with others below it (COMBINE, REPLACE, ADD, SUBTRACT, MULTIPLY). See Core Concepts. Visible as an icon in the Track Preview. -
Disable Scale FCurves- Prevents scaling transformations within the action from being applied (useful when using "Add" or "Subtract"blend types). Visible as an icon in the Track Preview. -
Animation Speed- Modifies the playback speed of the action within the strip. Values > 1 slow down, < 1 speed up. -
Animation Repeat- Number of times the action repeats within the strip's duration. -
In Place- Prevents the chosen bone (or all bones if***ALL BONES***option is selected) being displaced (transform locations being changed). See the In Place Animation feature description. Visible as an icon in the Track Preview. -
Only Selected Bones- Limits animation to stored selected bones. Animation data for any other bones within the strip's Action will be ignored. This allows for isolating or excluding parts of an animation non-destructively. If no bones were previously stored, enabling this setting will store the currently selected bones. If no bones are currently selected either, enabling the setting will have no immediate effect until bones are selected and the stored selection is updated using theUpdate Bonesoperator. TheUpdate Bonesoperator overwrites the stored selection with the current bone selection; it is disabled if no bones are currently selected. TheShow Bonesoperator deselects all bones, and selects the stored selection. Visible as an icon in the Track Preview.Note: This feature uses the stored selected bones, not necessarily the currently selected bones in the viewport. The key advantage is consistency: the strip always uses the stored bone selection, regardless of which bones are currently selected in the viewport. It will continue affecting only the stored bones until you explicitly update the selection using theUpdate Bonesoperator or disable theOnly Selected Bonessetting entirely. See also Operator Reference. -
Add Displacement Modifier- EnablesLinearorCyclicdisplacement modifier. See the Key Features section above for details on modifier properties (Displaced Bone,Location Index,Speed,Amplitude,Offset). Visible as an icon in the Track Preview. Use theCalculate Linear Offsetoperator here for linear modifiers.
Is Editable Action property. However, be aware that if you're trying to keyframe bones in such a converted strip, those bones might already have keyframes from the original action, potentially leading to unexpected results.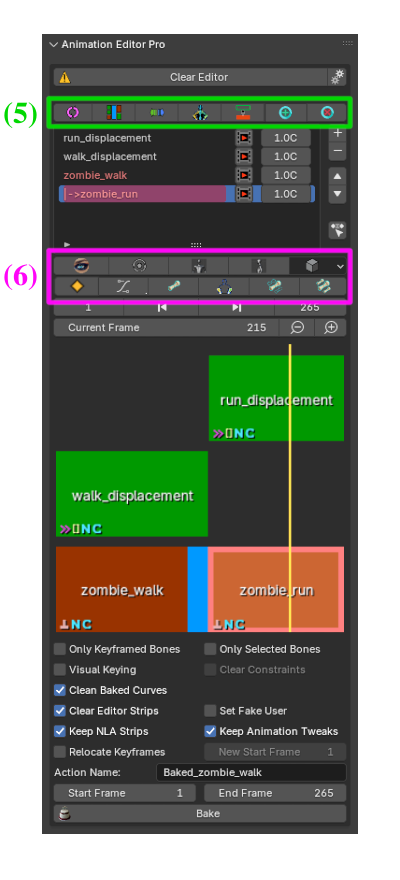
Strip Operators - (See user interface image - (5) )
Tools to create and modify tracks, strips and transitions. See also Operator Reference.

Make Cyclic Animation- Creates a seamless animation cycle by generating a smooth transition strip from the final pose of your animation stack back to the starting pose. The new strip is placed at the very end of the entire editor strip setup. The duration of the blending is controlled byTransition Length.
Create Global Transition- Create a global transition strip (in a separate track) between the poses given byStart FrameandEnd Frame. The duration of the new created strip is given byTransition Length, and is given in seconds. IfOffset Subsequent Stripsis enabled, any strip starting at, or later thanRelocation Frame, is shifted forward or backwards in order to fit the new global transition strip. UsuallyRelocation Frameis the same value thanEnd Frame. You can choose what type ofInterpolationhave the new created keyframes.
Mirror Animation- Mirror the entire animation or a portion given by the supplied frame range. The result is a new strip that is non-destructively placed at the very end of your overall editor strip setup.
Copy Animation from Selected Bones- Copies animation from selected bones to a new strip. Can optionally extract (remove) the animation from the source strip (and its underlying action) with theExtract Animation from Originalsetting. Very useful for isolating bone groups into separate strips, allowing each group's animation to have different properties (like influence or speed). (See Key Features and Splitting/Refining workflow).
Move Strip to New Track- Moves the selected strip from a multi-strip track into its own new, separate track. Removes associated local transitions if any.
Add Local Transition- Adds a local transition strip between the selected strip and the preceding strip in the same track (if one doesn't exist). See Local Transitions.
Remove Local Transition- Removes the local transition strip preceding the selected strip (if one exists). See Local Transitions.
Extract Animation from Original setting, the animation for the selected bones is duplicated, existing in both strips, which is usually undesired. Also note that when extracting animation from original, the animation for the selected bones is removed from the underlying action (action associated with the strip).Utility Operators - (See user interface image - (6) )
Set of useful tools to change 3D view, keyframe, symmetrize, reset, isolate bones, and more. See also Operator Reference.

Show/Hide Overlays- Toggles rig display and viewport overlays.
Toggle Rotate Tool- Switches rotate gizmo on/off.
Front Orthographic View- Sets view to front orthographic.
Left Orthographic View- Sets view to left orthographic.
Orthographic View Menu- Menu for all orthographic views (front, back, left, right, top, bottom).
Insert Keyframe- Inserts keyframes for selected bones on the selected editable strip at the current frame. The operator icon can display one of three possible states:- Enabled - You can insert keyframes. The current frame is within the selected strip's range.
 Enabled (Warning) - You can insert keyframes, but the current frame is outside the selected strip's
 frame range. Keyframing here might not be intended. Disabled - You can't insert keyframes. The selected strip is non-editable.

Interpolation Mode Menu- Sets default interpolation for new keyframes (Constant, Linear, Bezier, etc.).
Reset Bone Transforms- Returns selected bones to rest pose.
Symmetrize Bone Selection- Copies the pose from selected bones to their counterparts on the opposite side (requires standard L/R naming convention, i.e., foot.l/foot.r).
Isolate Selected Bones- Hides all bones except selected ones.
Restore Hidden Bones- Shows all hidden bones.
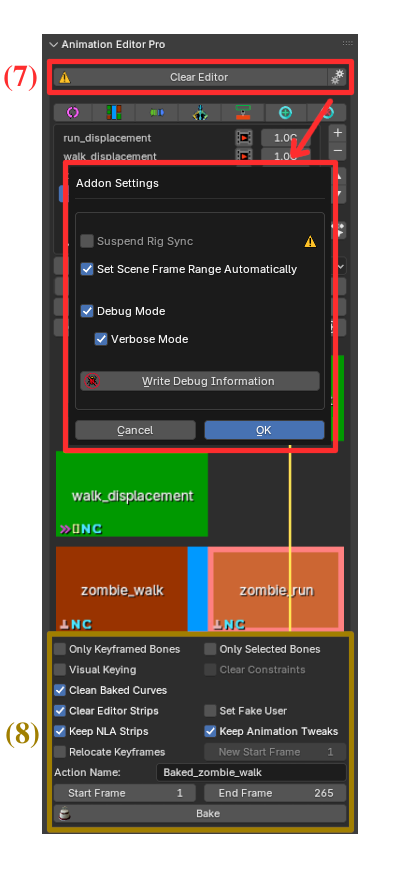
Addon Settings - (See user interface image - (7) )
Located at the top of the editor ( icon), next to the
 Clear Editor operator, this button opens the Addon Settings window.
It is important to distinguish between these two areas:
- The Addon Settings window is a pop-up designed for convenience and quick access to your most frequently used options. It contains a mix of two types of settings:
- Per-Armature Settings: These options affect only the currently selected armature and are saved with your .blend file.
- Global Preferences: For your convenience, a few global preferences are also included here. Changing these is the same as changing them in the main Addon Preferences window.
- The Addon Preferences (
Edit > Preferences > Add-ons > Animation Editor Pro) contains the complete set of all availableGlobal Settingsthat affect the addon's behavior everywhere.
- Suspend Rig Sync (Per-Armature) - This is a per-armature setting that temporarily disconnects the selected rig from the addon's control system.
- What It Does: It suspends all automatic updates and synchronization for the selected armature, effectively "freezing" its state within the addon. All other armatures in your scene will continue to function normally.
- Primary Use Case: This feature is designed to allow other addons or external scripts to safely modify the armature's underlying Action data (
animation_data.action) without interference. Once your external process is complete, you must disable this setting to resume control with Animation Editor Pro. - Important Limitation: This feature does not enable compatibility with the standard NLA Editor. Even when synchronization is suspended, simultaneous editing with the NLA Editor is not supported and can lead to data conflicts. (See Compatibility section)
- Set Scene Frame Range Automatically (Per-Armature) - Automatically sets the scene frame range to encompass all unmuted strips.
- Debug Mode (Global) - Activate debug mode to begin storing debug information in RAM. The stored debug information consists of internal function values from the Animation Editor Pro addon. This information is kept in RAM and is only written to a file when the you use the
Write Debug Informationoperator. - Verbose Mode (Global) - Activate debug verbose mode. This mode adds an extra level of debug information. It only has effect if
Debug Modeis enabled. - Write Debug Information - This operator will write debug information to a text file. It is enabled only if
Debug Modeis enabled. IfVerbose Modeis activated as well, an extra level of debug information will be written to the file. You can safely leave both options enabled. The addon only stores information about its internal functions in RAM and only writes this data when you click the operator. See the Bug Report - Support section for more information.
Start Frame and End Frame). Remember to re-enable it when you want the frame range to resume updating automatically.Clear Editor Operator - (See user interface image - (7) )
Located at the very top of the editor ( icon), this operator removes all strips managed by Animation Editor Pro from its interface, and optionally, from Blender's underlying NLA system for the active armature. Additionally, you have the option to keep or remove the tweaks made by the addon to the action F-Curves. The underlying Blender Actions themselves are not deleted by this operator. However, if an Action is no longer used by any strip or object and does not have a
 Fake User assigned, Blender may delete it when you save and reopen the file.
Options include:
Set Fake User- Set a fake user for all strip actions in the overall editor strip setup, to preserve them.Keep NLA Strips- When enabled, this option preserves the final NLA track and strip structure created by the addon. Instead of being deleted, the animation becomes a standard, fully editable NLA setup.Keep Animation Tweaks- This ensures that any underlying F-Curve modifications (like mutes or modifiers) managed by the addon remain active, guaranteeing a visually consistent result after transitioning.
Keep NLA Strips and Keep Animation Tweaks options.Bake Operator - (See user interface image - (8) )
The Bake operator ( icon at the bottom) combines all visible, unmuted strips into a single new action. It is not just the classic Blender's Bake operator, it includes some powerful preprocess and postprocess operations that complement the rest of the Animation Editor Pro's features.
Options include:
Start FrameandEnd Frame- Defines the frame range for the bake operation. By default, this range encompasses all active (unmuted) strips.Only Keyframed Bones- If enabled, the bake operation will only include bones that have animation data (keyframes).Only Selected Bones- If enabled, the bake operation will only include animation data for the currently selected pose bones. This andOnly Keyframed Bonesare mutually exclusive options.Visually Keying- Keyframe from the final transformations (with constraints applied).Clear Constraints- Remove constraints from keyed object/bones. This option has effect only ifVisually Keyingis enabled.Clean Baked Curves- Optimizes the resulting animation curves by removing redundant keyframes.Clear Editor Strips- If enabled (default), removes all strips managed by Animation Editor Pro from its interface, and optionally, all Blender's tracks and strips after a bake operation (using theClear Editor Operatorlogic), leaving only the baked action assigned to the rig.Set Fake User- Set a fake user for the baked, and all strip actions in the overall editor strip setup, to preserve them. This option has effect only ifClear Editor Stripsis enabled.Keep NLA Strips- When enabled, this option preserves the final NLA track and strip structure created by the addon. Instead of being deleted, the animation becomes a standard, fully editable NLA setup. This option has effect only ifClear Editor Stripsis enabled.Keep Animation Tweaks- This ensures that any underlying F-Curve modifications (like mutes or modifiers) managed by the addon remain active, guaranteeing a visually consistent result after transitioning. This option has effect only ifClear Editor Stripsis enabled.Relocate Keyframes- If enabled, all strip's keyframes will be relocated starting at theNew Start Frame.New Start Frame- New start frame for relocated baked action keyframes. This option has effect only ifRelocate Keyframesis enabled.Action Name- Name for the new baked action. A name composed by the prefix 'Bake_' followed by the name of the very first added strip (the base strip) is given by default, but you can change it here.
Clear Constraints option might ruin your rig by removing some necessary constraints. Use it only if you know what you are doing.Keep NLA Strips and Keep Animation Tweaks options.Start Frame different from 0 or 1), the action keyframes are placed at Start Frame value unless you enable Relocate Keyframes option and set the desired New Start Frame.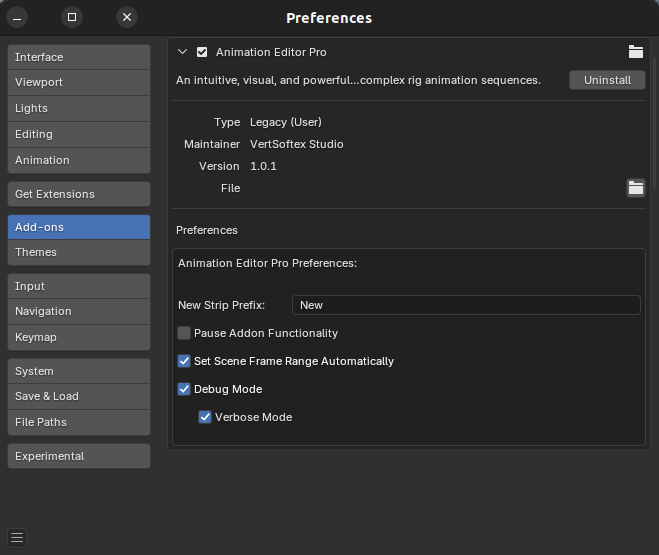
Addon Preferences
Configure the addon's global settings and default behavior. They can be found in Edit > Preferences > Add-ons > Animation Editor Pro.
New Strip Prefix- Prefix added to the name of the new added strips (see theAdd Stripoperator).Debug Mode- Activate debug mode to begin storing debug information in RAM. The stored debug information consists of internal function values from the Animation Editor Pro addon. This information is kept in RAM and is only written to a file when you use theWrite Debug Informationoperator.Verbose Mode- Activate debug verbose mode. This mode adds an extra level of debug information. It only has effect ifDebug Modeis enabled.
Conclusion
The Animation Editor Pro interface provides a comprehensive set of tools for managing and editing rig animations in a mixed fashion - stacked (layering) and linear sequencing (composited tracks). By understanding the different strip types, properties, and operators, you can create complex animations more efficiently than with Blender's standard tools alone.